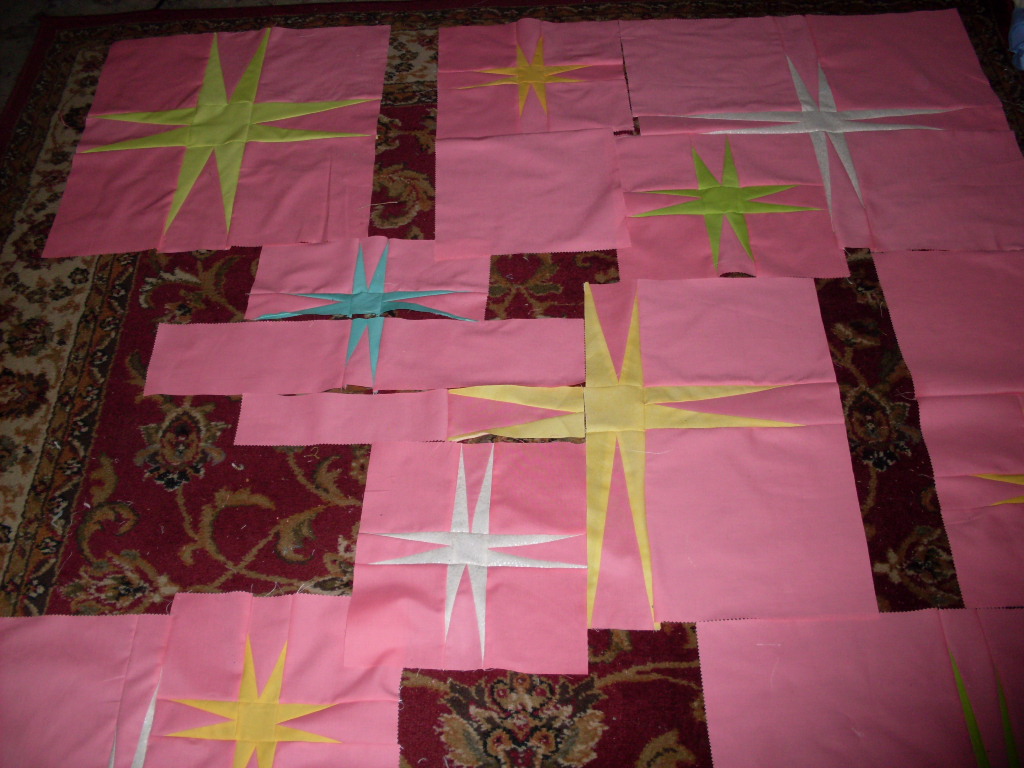
Friday, October 6, 2017

Palmateer Point Quiltalong

I've followed Lori's blog at Humble Quilts for several years now.  I think it was the first blog I ever followed.  I love her color palettes even though they seem to be colors that I don't often buy.  I've never done one of the quilt alongs that she has and I've regretted it every time.  So when she started a new one several weeks ago, I decided to join in.  Since it was a 21"  project, I wanted to use the same types of colors not my usual brights.  I dug deep into my stash and came up with these for week one.
I went back and forth on whether I liked this combo or not...sometimes it seemed too busy and not enough contrast and at another look I liked it.  I decided to let it stand as it was a mystery and I didn't 
know how they would be used.

Week two was the half square triangles made very easy with my Quilt in a Day Triangle Square up Ruler and making 8 at a time.  Week three continued with sewing the HST's together.
Week four was the reveal and putting it all together!  Such a cute pattern...I'm thinking about doing it again in Christmas colors.  
I do wish I had gone a little darker for some of the smaller squares but overall, I'm happy with it.  Now to decide how to quilt it.   Thank you Lori!

Linking with Humble Quilts for the link party
Busy Hands Quilts for Finished or Not Friday

Saturday, September 9, 2017

Starting Over

Quite a few of my circles for the Quilty 365 project have come from charms and fat quarters which leave a small scrap too big to toss out.  In an effort to use these up and improve my skills, I surfed and found the Lazy Girl variation of the Single Girl quilt.  Perfect!  Practice in curves, uses lots of scraps and something a bit different since it was popular about six years ago...way before I started quilting.

I decided to make four squares...a complete circle to try it out.  In the process, I've learned several things.
1.  a quarter inch difference in matching the centers equals about 3/4 inch off in the sides.
2.  I'm going back to my apparel sewing technique of marking the wrong side of solid fabrics with
     blackboard chalk.
3.  Actually sewing the curve was not a problem...just like setting in a sleeve.
4.  I really, really need more accuracy in pattern drafting
5.  trying to figure out which way to slant a seam for an angle is really hard if you have no spatial            ability at all.

Back to the drafting table for another try!

The solid is Kona cotton Valentine.

Linking with Em's Scrabag

Sunday, September 3, 2017

August Quilty 365


August was over way too fast for me....I got way behind on everything this past month!  I did get my circles sewed and turned but that was about it.  I'm still trying to decide what to do with them.  I'm leaning towards the flower design with a dark green background.  August was more colorful than July with more summer flowers.

I did manage to get some of my collection of thrift shop shirts turned into fabric....and I have some summer fruits and a bunny fabric.

I do wish I had a better bunny fabric...this is in honor of the little half grown bunnies that come out in the evenings and graze in the grass/gravel parking lot next to me.  I live downtown, in a business district, so I do enjoy seeing all the urban animals.  I usually have an opposum and a raccoon that will visit ie..come inside and eat my cat's food in the middle of the night! but I haven't seen them this summer and my cat didn't bring in any baby bunnies to play with so it's been a good summer overall.

I've decided to hand quilt my six months version and will be putting that together in the next couple of weeks.  I've never done that before so we shall see how it goes.  Any tips are appreciated!

Linking with Daisy and Jack Handmade
Em's Scrapbag

Sunday, August 20, 2017

Christmas in July/August

Before


and after


I love trip quilts...it's always so much fun to see how the colors blend and form the pattern.  This is for my version of the Santa's Trip from the 12 Days of Christmas in July Blog Hop. I'm very slowly working on it....Sarah gave a very good  plan to complete this quilt in the 12 days but I've fallen behind this past week...other distractions got in the way.  Maybe this coming week will be better....only three more panels to cut and stitch.

Most of these fabrics are from my stash and are not actually Christmas fabrics at all.  When I went through my stash and pulled holiday fabrics, I found that most of them were smaller pieces, so I went with color and pulled red and green.  A quick trip to JoAnn's gave me a couple seasonal fabrics to add in.  Much more fun than the plain white I was thinking of.


Linking up LoveLaugh Quilt  for Monday Making

Monday, August 14, 2017

Improv PeaPatch Finished


I realized after my last post that I had sewed some of this together backwards and also left out a piece!  Now that our weather is back to normal, I took some of it apart and put it back together.  I used this to practice my circular quilting...still need more practice..and to test out the power and some stitches on my new sewing machine.  It's my third machine in two months and it's working reasonably well for it's size and cost, so it will be a keeper unlike the previous models.

It's called Improv PeaPatch after a gardening program here that I took part in about 35 years ago when it first started here in town.  For a small price, you could rent a 10 x 20 foot patch of ground and garden.  Lots of families and kids working on their plots so the rows weren't very straight and all the crops were mixed together...one couple grew nothing but dahlias!  Very pretty.  I don't now if it's still going on and later it got quite expensive and very regimented but it was fun in the early years.

This is one panel of my Santa's Trip quilt. I've got two and a half panels done, so only one and a half to go.  I'm hoping that I'll have enough cut and put back together by Friday so I can see how the little squares will look.

Linking with Em's Scrapbag for Moving it Forward Monday and LoveLaughQuilt for Monday Making

Tuesday, August 8, 2017

Stripes!

I saw the notice of the Improv Stripes Quilt Along on The Quilter's Table blog and decided it might be fun to try even though it takes place mostly on Instagram.  After a couple of days, this is what I have.  I think the lump in the middle is a weed...it doesn't show up on my floor.  I'm now trying to decide how to finish it with quilting and binding.

I have several projects going on that need completing, such as my Bear Paw, the Santa trip around the world quilt, and the fences from the In My Neighborhood row quilt, so why start a new project?  The answer is simple...this one required little ironing!  We are now going into our second week of temps in the high 90's F and I don't have air conditioning.  My cat, Licorice, has hated the fan for the past several years and now is actually sitting about five feet in front of it and getting her fur blown!  That's hot!.

One panel of my Santa's Trip quilt from the 12 Days of Christmas blog hop is now finished and I do hope to complete the three other panels in the next couple of days.

Tuesday, August 1, 2017

The Second Six Months (Quilty 365)


Looking at all my circles, July seems to have been a pretty dull month.  Lots of pastels trying to forget the heat, reds when the heat got the better of me and a small piece of Japanese bamboo fabric.  I did get some navy blue stars for Independence Day.  The zigzag  fabric was new for an experiment but turned out to be so poorly printed that the lines wouldn't align.  The rest of the piece will probably be popping up in small bits for the next several years!

In my last two posts, I explained that the first six months of circles are now being made into a quilt because of the size consideration.  It's 48" x 60" before any borders.  I don't think that I could handle a quilt double that size.  So now what do I want to do with the next six months?  I haven't put them on squares yet because I think I want to go in a different direction.

Clamshells, maybe?
or flowers
or tightly laid out on the backing fabric with diamonds showing?

All of these were just quickly laid out.  Any other suggestions or comments?

Linking up with Daisy and Jack

Monday, July 31, 2017

The First Six Months (Quilty 365)


Here are my first 6 months of circles sewn into their rows.  I have 15 rows of 12 squares...each square finished at 4 inches.  Right now, they are in groups of four rows with one row of three strips for ease of quilting.  As things stand, I may be quilting this on my featherweight!  I do plan to add a narrow inner border and an outer border.

For the layout, I divided my circles into light and dark of each color and put the whites and neutral in the center.  I worked in a circle from the center and put them in order according to a basic color wheel. There were some surprises...a lot less red and green and more blues than I expected.

For those of you that might not be familiar with the Quilty 365 project, the object is to make one circle a day for a year.  Your circle might represent your feelings,  temperature, or even scrap reduction.  I've done it all and also marked some holidays.  We link up on the first of  every month at
Daisy and Jack Handmade.

I've been making my circles with a fusible which is then turned forming a circle which has less points than if I tried to do basic  needle turn applique...arthritis has made my fingers fairly stiff.  In my first Quilty 365 post, I showed how I did this.  All my Quilty posts are labelled, so if you want to see a closer view of  them, just click the label.

Another view

Linking with
Monday Making at Love Laugh Quilt
Moving It Forward at Em's Scrapbag
Oh Scrap at Quilting is more fun than housework
Daisy and Jack Handmade

Monday, July 24, 2017

Quilty 365 Halfway


I started the Quilty 365(2017) project with Leanne of .Daisy and Jack Handmade in January after seeing her post.  I did make circles to include the first 2 weeks of that month so that January was a complete month.  Unlike some BOM's and other monthly or weekly projects, I've kept up with it.  Some months have been a scramble and I'm running dangerously low on fabrics but I now have a complete 6 months of circles on 4.5" squares.

It was while I was working on my July circles that I started wondering how I was going to put them together.  I went back and reviewed my Pinterest board and then it hit me...some of those quilts are huge!  Way more than I can handle in my limited space.  I started laying them out and found that I have 15 rows of 12 squares each. That almost covered my 5x8' livingroom rug.  After some rearranging, I came up with a layout and started sewing.  Here's were I'm at currently...halfway through the year and halfway through my rows.

These are hanging on my front door.  My seasonal door dec until I can get them joined together!

Linking with Love Laugh Quilt for Monday Making and Em's Scrapbag

Monday, July 17, 2017

In My Neighborhood

I've been sewing along with the row by row monthly quilt along at Quilter Chic.  I did complete rows one and four, which you can see here.  Row 5 is a fence with quilts hung on it...lots of little pieces! It's been very slow progress but I have just two half blocks to go on it.  Row 6 is another fence which I haven't even started yet.  Finishing those two rows is my to do list for this week!

 Row 7 came out this past Saturday...houses at the seaside...fun to do and a very nice break from little bitty fence pieces!


Each row is 48" long and won't fit into a single camera shot...this is the best I could get.

Rows 2 and 3 haven't been started yet and I've decided not to do them.  Very nice rows but they just didn't fit into what I wanted.  I finally decided  that it's called In MY Neighborhood so I'm replacing them with my own rows.  This is my cat, Licorice, chasing birds.  She doesn't catch them...just likes to scatter them!

I got out my graph paper and started in.  The birds were fairly easy.  I based them on a free foundation pieced design...seen here, that I bookmarked several years ago.  I drew the cat, carefully counted all the squares to make sure that the size was right, added seam allowances to all pieces and double checked to make sure that the design was sewable without Y seams and made a list of all the pieces needed.  Halfway through the sewing, I realized that the cat was coming out way to large!  I made some adjustments such as changing the bow to a collar and taking a curve out of the tail and hind leg and the final version does fit the size I needed.  I've gone over my pattern several times since and I still can't find where I went wrong.  I now have a whole new respect for pattern designers!

Linking with Moving Forward Monday and Monday Making

Thursday, July 13, 2017

July Mini Quilt

I've been doing the monthly mini quilt sew along from the Sew Can She blog.  The patterns are free and I'm enjoying seeing the new one for each month.  But I'm behind for various reasons...didn't really like the pattern, not the right fabrics on hand and basic procrastination are some of the answers. I'll probably be doing last month's sunflower (or daisy) in Fall colors!.

This month's is a cute red. white and blue design.  Since I didn't get to it before the fourth, I changed the colors somewhat..

after all, a ladybug needs some flowers to lit on!

The binding came out better than usual, but the corners are still a struggle.  I've got the mitering down but folding the corners out correctly is still iffy. More mini's will be coming up until I can get the process correct.

Linking with Busy Hands Quilts for Finished or Not Friday

Friday, July 7, 2017

OBW Progress

This is a rough layout of my One Block Wonder experiment.  I still have about 5 or 6 hexagons to  assemble and the ones above are pinned at the middle, which is why the sizes look a little off.  I'm still not sure if this was the best fabric choice.  I think I need more contrast color.  This kind of just blends altogether.  What do you all think?

Meanwhile, I'm behind two rows of the In My Neighborhood row by row quilt and I do want to do this month's Mini quilt from Sew She Can.. I'll finish those off while I decide where I want to go with the OBW project.

Linking up with Busy Hands Quilts for Finished or Not Friday

Monday, July 3, 2017

Stash Cleaning Result

I've wanted to do a One Block Wonder quilt ever since I saw my first one about 2013.  Last year, I even bought the Kindle version of the book.  What stopped me?  The fact that everything I read said that five or 6 yards of fabric was needed.  I'm retired and I quilt on a budget so spending  $50-$75 dollars on a fabric for a technique I might not like to do or choosing the wrong fabric didn't appeal to me.  I still checked out clearance fabrics and sales with this technique in mind, but never found anything I liked enough to try.

Last week, I cleaned out one of my stash boxes in an effort to find enough interesting fabric pieces to complete my month of circles for the Quilty 365 project and I found this forgotten piece of Kaffe Fasset fabric.

I bought this years ago for an apparel top and kept it to remind me to pay attention to those little rulers that show the  size of the pattern!  No way was I going to wear it so it went into the bottom of the box.  When I pulled it out, I found that the repeat was 12" and I did have enough to get the 6 layers needed even though the piece is only 2.5 yards.  It won't be a large quilt, but enough to be a learning project.

I've still got lots of triangle to sew together but this is where I'm at with the few I've finished.  The hexagons are pinned together.

Friday, June 30, 2017

June Quilty 365

I got a new background ....tiny yellow triangles on white...and I'm not sure I really like it.  In person, the yellow is hard to see and my camera makes all the circles look like measles!  I'm going for a scrappy yellow look and shall have to play around with these along with the previous months.  This month is noted for my using the last stack of my fat quarter stash....that's all the black prints.  In addition, lots of flowers and the green shamrock represents all the clover in our front yard!

Kitties!  In all honesty, the selvedge and my friend that sent me the black print claim that they are dog prints.  I did check against the paws of my cat that I had then and they are cat prints!  I'm sticking with that.

Victorian woman and children...I used this fabric ages ago to make a small ironing board cover.

Breast Cancer Awareness fabric from several years ago.  I never did find the right pattern or idea for it.

I had to clean out one of my scrap/storage bins to find enough fabrics for this month.  I've got several more to go, so I should be good for another month or two. That's an unexpected perk of this project!

Linking with Busy Hands Quilts for Finished or not Friday and .daisyandjackhandmade

Sunday, June 25, 2017

Flamingo Stars Top is Finished


This is my version, based on the pattern Stars Over Pink Flamingo by Valori Wells for Robert Kaufman. In the original pattern, some of the star points are 21" long.  Since I was only able to get a layer cake and a charm pack, my largest star points are only 10" .    Mine is 50" x 60" and I have 4 full layer cake pieces and 2 charms left over plus lots of scraps. I'm thinking about adding another 5" to one of the sides to make it 55"x60".  I shall have to stare at it some more!


As you can see, it still needs further pressing on some of the seams.  Since it's currently about 98F outside and about the same inside, that is not going to happen until the weather breaks.
This was a fun project to do and I really grew to like this shade of pink.  I wasn't sure when it arrived but it is an orange-pink, unlike most of the pinks I see in the stores.

The stars were fun, once I realized I could make my own sizes and arrangements.  I did a post on how I made them here.

Linking with Monday Making and Em's Scrapbag. Also Busy Hands Quilts

Friday, June 23, 2017

Filling the Holes

All the corners are sewn together and I think this will be the final arrangement.
The top half, looking up.....

and the bottom portion.   My place has windows on the north and east so even though it's a nice sunny day, I'm in the shade.  Nice for summer heat but really bad for picture taking.  

It's working out to be about 54" x 63".  I have two of the five inch charms left and about 12 of the layer cake pieces.  Once it's all together, I may be able to add some length  or width to it.

Except for the Pink Flamingo fabric, the rest is all from stash and leftovers from other projects.  There are 2 shades of green, 2 shades of yellow, turquoise and white.  The white is a metallic type from last Christmas and really shows up in the shade.

This is the entire piece.  Now to put all my puzzle pieces together!

Linking with Busy Hands Quilts for Finished or Not Fridays and Can I get a whoop whoop?
Show Off Saturday,and Quilting is more fun than housework

Tuesday, June 20, 2017

Making the Stars

The stars for my Stars Over Pink Flamingo are made by using dots on the wrong side of the fabric.  I had thought I was probably the last person to know this method, but several people have commented on the narrow blades and my terminology of "dot method"  so if I'm not alone, here is the method. There are a lot of pictures in this post!

Finished Star

The directions given in the download are to to cut the star pieces (green) one half inch wider and longer than the back ground color, pink.  This resulted in a lot of fabric cut off and into the scrap pile. I resized to make both pieces the same width. So far, no problems and little less into the scrap pile.

Start with the background size that you want.  Here I'm using a 2.5 inch strip. Measuring 1/4" in from the edge, place a dot in the center of the fabric's wrong side.  Do the same on the  other end of the piece at the length of the points.  Draw a line to connect the dots.  I used a pencil but here, I used a Zig pen so it would show better in the photo.
Next, place this piece on the star fabric right sides together aligning the left hand side of the fabrics.  This where I stopped cutting the individual pieces and just used the entire strip, leaving some excess at the top and bottom


With the center dot facing you, sew along the left hand side


Cut the pieces apart and press open so that the star fabric is facing left.


Repeat for the other side


Press that side open, making sure that the entire background piece is visible.  Here is the view from the front


And ready for trimming.  Trim to the size of the background...the pink piece.


You will end up with three layers of fabric on each side.  Trim the two bottom layers, leaving a 1/4" seam.
Do this four times and you will have all your star points ready to assemble.

I do hope that this is understandable and the photos are clear enough to see...another grey day in the Pacific Northwest!  Please let me know if you need anything clarified or see any glaring errors in my method.

Linking up with Em's Scrapbag

Sunday, June 18, 2017

Still Seeing Stars

This is where I'm at at the moment.  The large pink squares are laid out to mark the approximate size that I'm going for.  I need a few more stars and then I'll try fitting it all together without too many seams or smaller pieces. I did find that my charm pack is a noticeable dye lot difference from my layer cake.  You can see it a bit in the turquoise star on the left hand side.  Once everything is together and quilted, I'm hoping that it will be less apparent and look like a trick of the light.

The instructions do show how to lay it out in units but I didn't really understand them.  Lots of half stars to be combined in different sections.  Since I don't have the fabric to make all the sizes of those stars I'm doing it on my own.

In my last post, I showed the pile of scraps left over from just one star.  It was a large star but still too much waste for me...I used almost an entire fat quarter on it.  The instructions gave a size of one half inch larger than the pink piece.  I reduced that by half inch and could probably go a little smaller without too much of a problem.  The half inch doesn't sound like much but with eight pieces per star, it adds up and I already have lots of scraps.....hence the title of my blog!

Linking up with Oh Scrap! , Em's Scrapbag and Monday Making

Monday, June 12, 2017

Seeing Stars

My new project is a free pattern from Robert Kaufman Fabrics called Stars Over Pink Flamingo.
I've always wanted to do a star pattern and I really loved the look of these stars.  Getting the Pink Flamingo fabric has been more of a problem than I anticipated.  I ordered a layer cake from a deal on one website along with a charm pack (they were out of yardage)....after several emails, they shipped my layer cake three weeks later but cancelled my charm pack.  After more emails, I got the charm pack but still no yardage available.  Right now, I'm making what stars I can according to the pattern directions and will probably make it as a lap size quilt.

The white fabric of the smaller star has irridescent  circles and doesn't seem to be on the Connecting Threads website any longer.

The stars are made with a new to me technique involving measuring dots and drawing seamlines on the back of the pink fabric.  It makes very nice stars but there does seem to be a lot of fabric cut off.
This is the waste from the large pink and green star.  I'm trying to look at it as precutting my next project!

Linking up with Em's Scrapbag

Monday, June 5, 2017

Slow Progress....

I started this version of Melissa Corry's Playing the Scales quilt several weeks ago as an attempt to use the ancient blue stash.  Got it cut and then it sat.
These are the strips, finally sewn into the groups of two. I decided that this time around, I'd just sew all strips into two's and then rearrange for a better color/pattern distribution.  It's difficult to work with no floor space left and this quilt  is too large to lay out completely without moving furniture around.  My cat left this alone until I ironed the strips and then decided that she only wanted to sleep on ironed fabric!

Another view
I have 11 more strips to lay out and sew together. I'm looking to finish by the end of the week.  It really is a fast quilt to do unless  you are a fiddler like me.  I can sit and stare at it. move one strip, then another and so on.....

Linking up with Oh Scrap and Em's Scrapbag